Showing posts with label featured. Show all posts
Showing posts with label featured. Show all posts
Saturday, 25 May 2013
Retro bed table


Materials: EXPEDIT (44x44 cm) white and black
Description: Our IKEA hack is very easy. As we have black&white bed, we were looking for something simple that would match in colour and both of us will like (and of course will not be expensive).


We decided for combination of dark and white EXPEDIT shelves. We followed the regular instructions from IKEA, but than mixed the material. And tadada.. :)
~ Spekulujeme
Wednesday, 22 May 2013
Stereo System with 4 Bland Matt bowls and 2 Lack Shelves

Materials: The Loudspeakers: -4 Blanda Matt 28 cm Bowls -2 full band 4" speakers -4 binding posts -6 drawer knobs -Stuffing material ( optional ) -Electric wire. The Amp and Preamp: -2 30 cm Lack shelves -Amp board + 220Vac/12Vcc power supply -Stereo potentiometer 2 x 20 Kohm - Binding posts, RCA connectors, blue LED + R 820 ohm
Description: I'€™m talking about a pre-amplifier, a power amplifier, and 2 loudspeakers (music source: my MP3 player).
The loudspeakers were built by using 4 28 cm Blanda Matt bowls.
The power amplifier is fit inside a 30 cm emptied Lack shelf.
The passive preamplifier, a simple 2 x 20 Kohm stereo potentiometer to regulate the music volume, is fit inside another 30 cm emptied Lack shelf.


You can find step by step building instructions for loudspeakers here.
file : casse monovia semplici, economiche alto WAF.doc ( one way, simple, cheap, high Wife Acceptance Factor loudspeakers )
Sorry, it'€™s written in Italian, but is full of pictures ;-).
Amp and preamp here. (this time in English!)
Thanks a lot to IKEAHackers site for giving me inspiration.
~ Luca, Monza, Italy
Mr. Hektar & Mrs. Arstid

Materials: HEKTAR & ARSTID ceiling lamps
Description: This is a really neat hack for office / bar / working spaces we thought about while looking for a low-budget lighting solution for our new offices.
It takes about 5 minutes to prepare this hack.
Make sure you have: 1 HEKTAR ceiling lamp and 1 ARSTID ceiling lamp.


Ingredients:
- Three 5mm screwing rods; 30 cm length
- Six nuts that would fit them.
- 40 cm electric wire extension + standard connector.
1. Drill three 5mm holes through the top surface of the HEKTAR lamp (the end closer to the ceiling).
2. Screw in the screwing rods into place.
3. Cut the electric wire from the inner HEKTAR light socket and connect the 40 cm wire extension by using the standard connector.
4. Attach the extended electric wire to the ARSTID electric supply panel.
5. Now you are ready to connect the three screwing rods to the ARSTID lamp's ceiling plastic connection plate. (There are three ready-made holes there that were meant for attaching the ARSTID lamp to the ceiling).
6. Secure the six nuts into place. (three at the top end of the rods and three at the bottom of course)
Enjoy your new stylish, industrial chic lamp :)
**It looks even better if you hang two or more in your office.
~ Yonatan Vagman
Friday, 17 May 2013
How to create a Gerhard Richtexpedit bedside cabinet

Materials: Expedit 2x2 and 1x1, inserts with door and drawers
Description: First of all, visit gerhard-richter.com and search some colour-combinations you like and buy them as spray colours.
Ikea does not offer a 2x1 Expedit, so I had to combine a 2x2 and a 1x1 in two 2x1.
I want a 2x1 horizontal with rolls, the vertical 2x1 is a side product.
I used my old and crappy 2x2 and bought a new 1x1.


You don't have to modify any Ikea-parts, all you have to do is simply combine the sides of the 1x1 with the tops of the 2x2 and the other way round, the rest is self-explanatory.
If you choose in the first step other colours than "white" you have to enamel the parts. If you like glossy, add a clear coat. The package of the 1x1 is a perfect spray cabin.
That's it.
~ cvb, Berlin
Thursday, 16 May 2013
2 x Frosta into a dress hanger

Materials: 2 Frosta stools, Blecka hooks, wood, jigsaw, drill, screws
Description: I was looking for a birch self standing dress hanger, but Ikea has unfortunately has little choice... so I decided to hack Frosta stool, inspired by previous hacks seen in this site.
I simply mounted inside-out the legs of the first stool, inserted and screwed a 140x4x4 cm wood stake; on the top of it I screwed the other four legs; I added 4 Blecka hooks; from the seat I cut 4 "slices" and mounted them as coat hangers....TA-DAAA!
~ Serena, Novara - Italy
Wednesday, 15 May 2013
Double Rast Cabinet Hack

Materials: Ikea Rast drawers
Description: Screw two Rast chest of drawers together, add some timber or MDF, decorate with molding and give extra legs. Voila!


See more of the double Rast cabinet.
~ Kata, Budapest
Tuesday, 14 May 2013
Framed: Vika Furuskog gets a custom base

Materials: Vika Furuskog table top, 14 ft 1x4s and 12 ft 1x3s, compound miter saw, Kreg Jig
Description: We built this desk for my son's tween room make-over.
Here is how we did it.
We bought a VIKA Furuskog table top at IKEA and some pine boards at the hardware store. We got 12 ft 1x3 for the frame to hold the table top and 14 ft 1x4 for the table legs.
Here you can see the cut list.

We used 1x4 for the legs and 1x3 for the frame under the desk top. From the top: the first four boards will create the square frame that is screwed into the table top. The next two boards are the bottoms of the legs, the last four are the table legs themselves.
Here I added some orange dots so you can see where we put the Kreg Jig holes.

We drilled all the Kreg Jig holes, then clamped and screwed the wood together.

Then we attached the frame and legs to the table top. All in all, we built this desk, while I was wearing the green shirt, in about 2 hours.

I used oil based primer (two coats) and water based Alkyd paint (two coats) to finish the table.
Then we hung some shelves and a gallery wall above the desk. The shelves are Ash boards that I sanded and stained. We used the IKEA Ekby Bjarnum brackets to mount them to the wall.
See more of the Vika Furuskog custom desk.
~ Katja @ Shift Ctrl ART, California
Saturday, 11 May 2013
Full BILLY wall
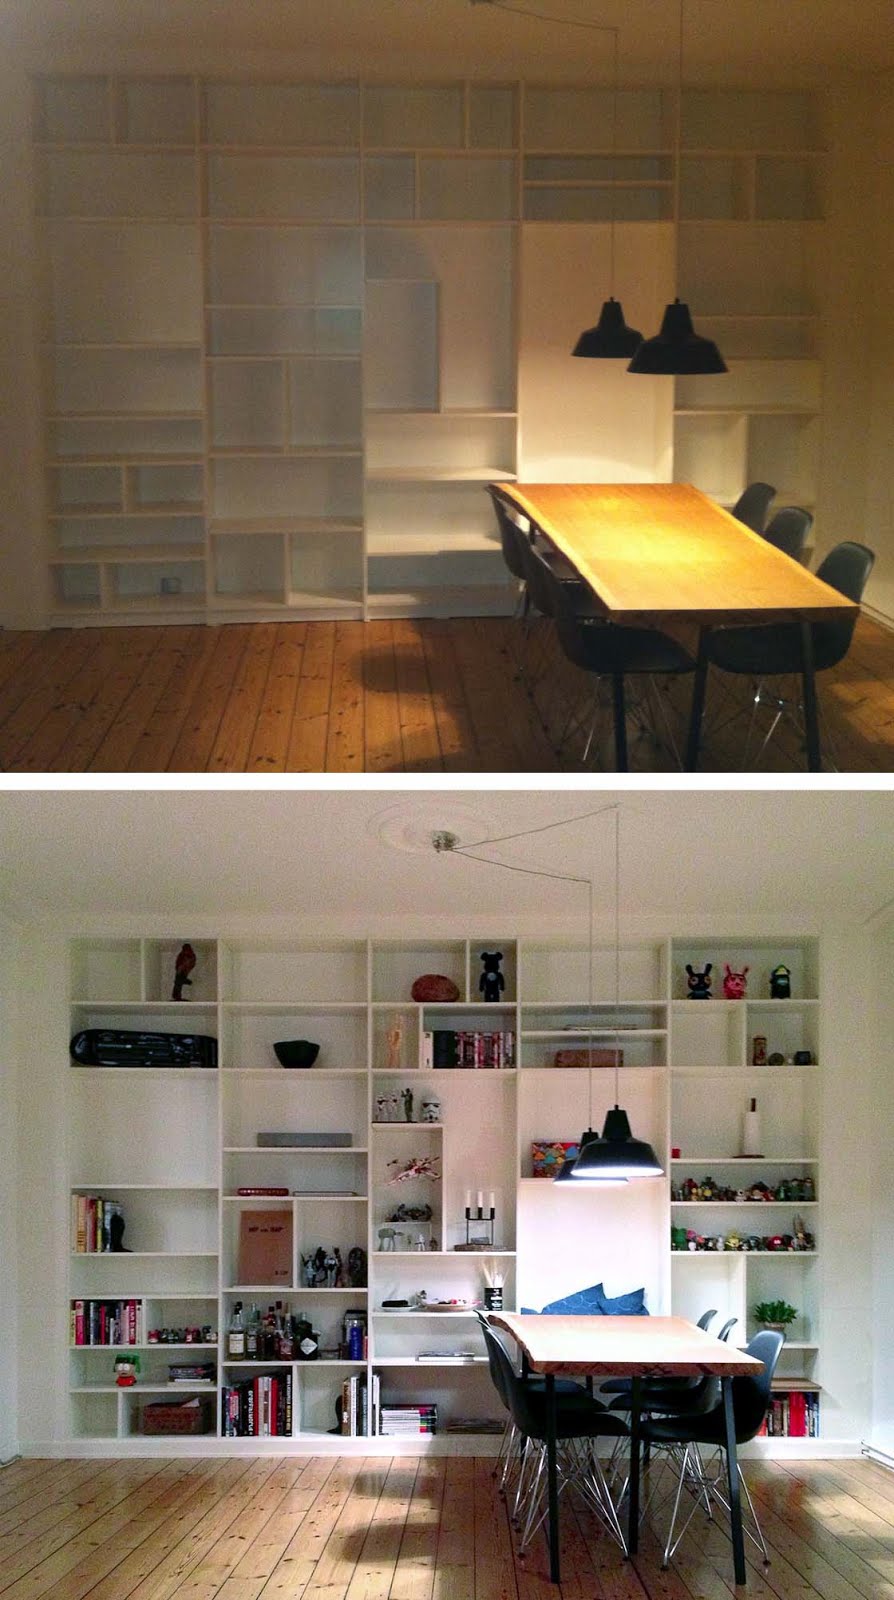
Materials: BILLY
Description: From IKEA:
5 large BILLY bookcases (80x28x202 cm) and 10 BILLY top bookcases (80x28x35 cm).


Removed every second vertical wall-side and drilled out holes to fit shelves/screws/etc on both sides.
Put together the 5 big bookcases first, placed wires on the back before mounting it to the wall. Once stable the smaller top cases were placed on top. The leftover wall-sides were used to fill the gaps around the bookcases and wall/ceiling.
Once done the light was added, vertical room "room separators" were cut to fit and a floor panel was added at the bottom.
~ Anders, Copenhagen, Denmark
Tuesday, 7 May 2013
Helmer-Air Renderfarm

Materials: Ikea Helmer cabinet plus a lot of fancy stuff
Description: We have optimized the original Helmer renderfarm for 24/7 Desktop computing.
We have used the standard Ikea Helmer cabinet to build a renderfarm in it.
Helmer-Air gots.
24cores, 81.6GHz and 96GB RAM.


A complete tutorial with all the Hardware and a lot of pics and Details on setup is here.
~ First Image, Germany
IDEALISK Jewelry Displays for Earrings

Materials: IDEALISK and RITVA curtain
Description: You need the IDEALISK grater, a piece of fabric, not woven into fine and a sewing machine. I've used a fabric rest from shortening a Ritva-curtain. First, you draw a pattern from the narrow and the broad side. Then cut each side double from the fabric with seam addition on all sides. Now sew the sides together and seam at the top and the button. Pull the fabric over the grater. The earrings can now be inserted through the fabric and the holes of the grater.
~ Katrin, Munich
Monday, 6 May 2013
Art desk for kids

Materials: Sundvik, Retur, Ekby Tony, Dokument, Ekby Riset
Description: For our 4 year old we needed as desk for her paintings with space for her pens, papers etc. She is too little for a bigger desk, so we build a "personal desk" for her.
The Ekby Tony board (of course you can use any other board instead, but this one has a great white colour) is sawed in to two pieces (one piece has to be long as the outside-distance of the table-legs of the short side of the table, the other piece has to be long as the inside-distance of the table-legs; a little piece of the Ekby Tony will be left over).

On the left side of the table (Sundvik) one piece (outside distance) is fixed with screws at the table-legs. Now you can pin the little waste containers (Retur) with screws on the board (after you put the drawers out you can drill a hole for the screws through the plastic wall, I recommend washers). For the right side of the table at first fix the elbow connectors (Ekby Riset) with screws at the second piece (inside distance) of the Ekby Tony board and then at the table legs. We fixed the Dokument cups with screws at the board.
~ prellmarke, Germany
Subscribe to:
Posts (Atom)